Saturday, 14 September 2013

Today I have


Just off out to choose some tiles and get a new microwave as our old one doesn't work with our new electrics and obviously don't look at the floor and lightshades (both 25 years old!) as they need to be replaced too!

Look at my little drawers under the hob - aren't they cute! completely impractical as they are so tiny you can't get much in them but hey I love them!  Can't wait to stamp out some lovely little labels for those handles.

We still haven't put everything away so I still have kitchen utensils in my ensuite, utility, porch and corner of the lounge but, thankfully, still non in my craft room!

Also a big Happy Birthday to my Mom - see you later :)

Thanks for looking - soon to be MasterChef from Solihull

Tuesday, 10 September 2013

Its all go....

Yesterday I had this:


today I have this:


can' wait to see what I have tomorrow! whoo hooo.

Amongst all the chaos I have managed to sort out my class at the crop next Sunday - we will be making two Christmas tags:


if you want to join in the fun please let me know asap so that I can prepare the bits and pieces - cost will be £6.

Also starting today is a fabulous blog hop all about pin cushions - if you want to join in the fun and see some wonderful creations published daily from now until the 17th (apart from the weekend) then pop over to Mdm Samms and click on the links there.

Thanks for looking - in need of a cuppa from Solihull

Friday, 30 August 2013

Tims August Tag

Had a fabulous time at T!ms UK event yesterday and I guess spending a few hours surrounded by lots of crafty folk has reinvigorated my papercrafting mojo as I have managed to grab an hour today to do T!ms August tag:


Have kept it fairly simple as I am also entertaining the children at the same time!  I did the background with Frayed Burlap and Iced Spruce stains, the stamps are from Artful Flight -CMS069.  The bird was stamped with Stazon and cut out from a masking sheet, then I stamped the image on the tag with Jet Black Archival and placed the mask over the top.  The nest was then stamped with Coffee archival and the cage from Crimson archival.  I then, with the mask still in place, inked the edges of the tag with Vintage Photo and over and around the tag with Mustard Seed.  When I removed the mask the image does indeed pop! 

I usually use post-it notes for my masks as I never like the area that never stamps properly around the edges of the layered image where it meets the mask, and the post-its, being slimmer, alleviate this problem, but now I have discovered the technique of leaving the mask in place and inking over and around it with blending tools (I find it very strange that I have never tried this before! I think I have always removed my masks straight after stamping)  I am much happier and will probably use these types of masks again - yes I think my mojo may be returning!  We shall see when the children go back to school next week as I am hoping not only to have a bit more time to myself but also a lot more energy!

Thanks for looking - Still on high from yesterdays class from Solihull

Wednesday, 21 August 2013

Hexie Blog Hop

Hi everyone,

It's my showcase day for the hexie blog hop and here is my project:


It's made up of 578 1/2" hexagons and measures 25.5" x 16".  I got the idea from the fabulous Hexa Go Go book by Tacha Bruecher who had a union flag in the back of the book but I didn't like that design as I am a true Brit and like my flag to have the bottom left hand side having a wider white part at the top of the red diagonal.  So I downloaded some blank hexagonal grid paper from www.incomptech.com/graphpaper/hexagonal and got busy designing - three evenings later I had finally ended up with a Union flag that looked correct so I purchased a set of Sizzix hexagonal dies cut out hundreds of .5" hexes from freezer paper - ironed them onto spare red, white and blue fabrics and got stitching.  Imagine my horror when I had it completed and compared it next to a picture of the Union flag to realise I had got it wrong!  (lesson learn't there to check out the item I am replicating first!)  So, being the fussy person I am, I unpicked the top left and bottom right hand sections and redid them (only took a couple of extra hours - no biggie really!) - it means the red diagonals don't got right into the corners as the true flag would but at least the blue sections are correct - who knew that the four middle blue sections are the same size? Not me anyway!

I was a bit worried that I had bitten off more than I could chew taking on this project as I only had four weeks in which to complete it but I managed to get the whole thing done in just two weeks! I was rather pleased with myself even if the house was a bit of a tip for a while!

For my second project I have done the table runner from the above book:


The white doesn't look so good on the picture but it does stand out in real life - here is a closeup:


 - and just to add my own twist (the above is basically straight out of the book) here is my own design on the back:

 
here is another closeup:
 

I used some wonderful Westminster Christmas fabrics that I won in the Ho Ho Ho hop last year.  I can't wait to use it as it will make a fantastic addition to my Christmas table this year!

Hope you have enjoyed my entries - here are the other sewers who are sharing my hop day:

Sunshine Girl Nicola you are here!
    Fish Kopp   

So pop along and check out all of their creations too :)  Also I want to say a big thank you to Debby and Mdm Samm for organising this wonderful hop.

Just edited this to add that if you were in the Dresden plate hop earlier this year you may remember my cog quilt - well its being published this month (September issue) in the British magazine Sewing World - very exciting!

Reedited again to add the Dresden link http://sunshinegirlnicola.blogspot.co.uk/2013/01/i-dared-to-dresden.html - never thought of that - thanks KaHolly!

Thanks for looking - addicted to hexies from Solihull

Friday, 16 August 2013

Toot

Gosh its an age since I have blogged - over a month in fact!  Nothing wrong just having some pc downtime at the moment and getting on with lots of home/craft projects rather than spending hours on pinterest!

Anyway a short post from me (need to get back in the swing of it I guess - hee hee) but I just wanted to shout out to the rooftops that I have been published this month in the British magazine Sewing World - I have been published numerous times in papercrafting magazines over the years but this is my first venture into sewing articles - let me know if you read it.

Am currently snowed under with sewing projects - I am in a blog hop for hexagons next Wednesday and in a pin cushion hop in September (have made four in the last two weeks) so its all go!

Thanks for looking - Enjoying the holidays in Solihull

Wednesday, 10 July 2013

Hobbycraft Workshops

I have been busy working away in my studio on my next few workshops which are:

Perfect Pearls on Tuesday 23rd July:


Here the workshop will be focussing on applying perfect pearls onto a tag inked with distress stains (the bird tag) and a tag painted with distress paints (the lamppost tag).  Perfect pearls give a stunning finish to any project and you will be amazed at the results.

Embossed card using a reflections stamp on Tuesday 3rd September:

This card uses embossing folders with T!ms reflections stamps and lots of inking. An eye catching card suitable for any occasion.

A promarker card class on Wednesday 11th September:

Here a stamped image will be coloured with promarkers using their fabulous blending properties and finished with My Minds Eye papers. 

Painting with Perfect Pearls on Tuesday 17th September:


Another workshop based around Perfect Pearls this time using them as paints, embossing folders, stamps and diecuts will finish this technique off perfectly.

All workshops cost £10 each and will run from 10.00am – 12.00pm on the date shown in the Hobbycraft store on the Solihull Retail Park, Marshall Lake Road, Shirley, Solihull, B90 4LD.

If you would like to attend any please contact me as soon as possible as spaces are limited.

Thanks for looking - enjoying the sunshine from Solihull

Thursday, 27 June 2013

Tims June Tag

Just a quick post - and only my second one this month - lots of pc downtime for me!

Here is my take on T!ms June tag which is very pink for me:


Have used Tim's Sewing stamp inked with Coffee Archival; Spun Sugar, Antique Linen, Tattered Rose, Tumbled Glass and Mustard Seed markers; Tea Dye and Broken China inks; Brushed Pewter Paint and a Picked Raspberry Stain.  I couldn't leave it unadorned without bits so I have added a mini mannequin and cotton reels covered with lace, tissue tape and muslin dyed with matching ink/stain/paint.  Finished with a muslin piece of ribbon at the top dyed with all the colours, two pins and a lovely sewing machine metal embellishment.

Thanks for looking - Missing the Sunshine from Solihull

Tuesday, 18 June 2013

I'm still here!

Sorry for being so quiet in Blogland for a while - about two months ago I decided to have three days a week not putting my PC on (I know!) which actually worked quite well and then three weeks ago I decided to drastly reduce my surfing time even more by only putting the PC on on one day and then seriously restricting the time I spent on there - this decision has allowed me to get lots of extra jobs done around the house that I wouldn't normally find the time to do (let's face it once we have started reading blogs and looking at pinterest it's easy to lose two or three hours a day isn't it!) - I have also been able to do lots of catch ups with friends I haven't spent much time with for a while and also get a whole host of crafting goodies completed!  I have been busy sewing lots and trying to teach myself free motion quilting - it's a lot harder than I first thought especially if you are perfectionist like me!

I have also arranged quite a few more workshops at Hobbycraft - I haven't yet taken photos of my latest lot though but I do have these to show you which are done using the new Distress Paints:

 
My  Tuesday workshop is fully booked but I do still have two spaces on Thursday 11th July at 10.00am - 12.00pm - classes are held at the Hobbycraft Solihull store and cost £10 - if you are interested please get in touch.

Drastically reducing my surfing time has been very rewarding but I do also miss looking at all the inspiration out in the big wide world and keeping in touch with all my online buddies - it's not too bad though as I can access all emails via my phone so I am still in regular contact with most!

Hopefully catch up with you all soon.

Thanks for looking - Finally Getting Things Done in Solihull

Monday, 20 May 2013

Tims May tag

Have had this done a while but it's been a bit hectic here - unfortunately I lost a friend I have known for 27 years a couple of weeks ago so that has been very sad but also I have got some more workshops in the planning and have had a visit to the Malvern Quilt Show so it's not been all bad! - anyway because of this and just life in general I have been busy so I haven't had chance to blog it:


done mainly with T!m products (of course!) and some old rubons I had lying around in a box from my scrapbooking days.  Am loving the effect of the stains over the rubons so I will definitely be using this technique again - not least to use some of my rubon mountain!

A big hello and thank you to my newest followers - thanks for joining me on my journey.

Thanks for looking - Busy stroking new stash from the Malvern Quilt Show from Solihull

Wednesday, 1 May 2013

WOYWW 204

Wow 204!  I haven't joined in for a while so I hope you all remember me!  Been doing lots of sewing and stuff with school recently but this week my papercrafting muse has taken back over and this is the state of my dining room table this morning (yes I am an early crafter!):


Making a travel book there for a workshop and the sizzix is out as I am designing a couple of sizzix classes for my local hobbycrafts - all very exciting.

Thanks for visiting me - am off for coffee and cake this morning as its the Wednesday thing to do in Solihull - well me and my friends part of Solihull anyway! - and will be back to peek at some desks later.  If you want to join in the fun of visiting workspaces all over the world then pop over to Julias.

Thanks for looking - Enjoying my sizzix from Solihull

Sunday, 28 April 2013

Shop opening

Oooh look who I just happened to bump into yesterday:


my gilet doesn't do my any favours does it! I honestly don't really look like a Michelin tyre man!

I popped into the new sewing shop opening in Moseley by Lauren of Sewing Bee fame yesterday with Julie and Aimee - we had a lovely time.

The shop is located in the Moseley Village in Birmingham - more details here.  Its a lovely place to visit with some lovely fabrics, a little coffee shop area, some fabulous Rowan wools and a wonderful light space for workshops on the second floor.

Thanks for looking - Got the sewing bug from Solihull

Friday, 26 April 2013

April Tag

Here is my take on T!ms April tag:


Oooh I have had such fun playing with these paints - they are lush! I am not sure whether it's because I have been busy sewing lately and not doing much papercrafting which is why I have fallen in love with tag making again or whether I just love it, love it, love it anyway and the love has never gone but just been on hold for a while!

Anyway some lovely new distress paints turned up last Monday but rather than just getting them straight out of the box and having a play I waited until I finished my quilt (on previous post) - so glad I did as it's now it's basically finished and not back on the UFO pile again!

So I opened Broken China and Mustard Seed and got swishing.  My stockist didn't have the metallic paints in so I mixed mine with the Antiqued Bronze stain which also gave really pleasing results.  I then coloured over the tag with Salty Ocean, Barn Door, and Wild Honey inks.  I love the background to this tag - will definitely be organising a workshop to teach this technique soon!

Then I had a fabulous play with the new butterfly die I bought last week (it was half price whilst I was teaching at Hobbycraft - so were a few other dies and it was funny how myself and the five wonderful students at my workshop cleared the shelf!).  Anyway I cut the butterfly out in white cardstock and then warmed up my melt pot.  Melt pots are fabulous tools - I have to admit that quite often I have a play and then its tidied away into the cupboard for a while but I still so love it and the effect it gives.  I heated up some Interference Blue UTEE and then added some red, blue and yellow To Dye For inks - I was aiming for the marbled look but slipped and ended up mixing all the inks together to give this lovely peachy/orangey colour so I dipped in the wings - love the tip from Hels last week on Create and Craft to use the heat gun to tidy up the edges - I never knew this so now my melt art can take on whole new look! whoo hoo.  Then I got out the Clearly For Art - this stuff is so fabulous - but as I had used a die I cut out the wings and then covered them with Red Pepper, Butterscotch and Stonewashed alcohol inks and then using the script reflections stamp, stamped the image with Archival Ink and wiped it away - such a cool technique and hence my beautiful butterfly was created!

I quite liked the idea of making up another little butterfly using cogs so these were my metal elements that I covered with Broken China and Mustard Seed paints and then completed using a metal spinner and a Prima Engraver Brad.  I didn't mix the colours up too much as it I wanted to it to look like patterns on butterfly wings.

I tattered and inked the edges of the tag with Vintage Photo, added a couple of stamps from T!ms Nature's Discovery set, cut and stamped out a ticket and stuck all my elements down.  The butterfly body is just coloured with black soot stain and glossy accents.

Love the technique for the ribbon although I used muslin - with Broken China, Mustard Seed and Antique Linen paints finished with Worn Lipstick stain.

All in all a lovely few hours play :)

Thanks for looking - having a playday Friday from Solihull

Tuesday, 23 April 2013

Keeping warm with T!m

I regularly use my sizzix dies for sewing and rarely publish them but in January I decided to go for it big style and started a T!m sizzix quilt.  When I discovered he wasn't going to be at the NEC Trade show in February I put it on the back burner as I wanted to show him it in person but a couple of weeks ago I got it out of the unfinished pile and got on with it.  I had done most of the blocks and had cut out the small squares so it just needed piecing together.  I first put it together with 9 blocks on the front and the text blocks on the back to make it double sided but then decided I wanted a longer quilt with a plain back - so that slowed me down for another week or so whilst I unpicked some blocks and reorganised it so that all the text blocks which were going to be on the back were now on the front and here it is finished:


Here are a few closeups:


had to have cogs on it of course! all pieces are machine stitched - I am just coming to grips with machine quilting but I am pleased with my results - my Bernina doesn't have a blanket stitch so this is the blind hem stitch - its actually grown on me now and I am going to be using it a lot more - my eye sight is making sewing by hand a pain as I usually do it in front of the telly in the evening but too much close work and watching tv is becoming a struggle in dim light - I probably need varifocles.....


obviously needed to make a sewn sleigh out of the sign post die - I was (in fact still am) so excited about all the fuss this stirred up - I had over 3000 blog hits!


I haven't got the witch die so this is actually from the mask - I drew around the outside and then appliqued her on, and lastly but obviously never least:


a few quotes, rather than stamping them (which I have been known to do on my quilts!) I used the wordplay die and cut out and sewed on all the letters individually.

Used some moda fabrics (browns, creams. light grey and blue) and then a plain grey and black, various dies, threads and beads.  Might do some more free motion quilting on it at a later date but for now its done!

Hope you like it - this will keep me all nice and snuggly next winter - although three weeks ago I could have used it couldn't I! but now the weather has turned I will display it with pride draped over my settee until the autumn.

Thanks for looking - all cut out and stitched up from Solihull

Monday, 15 April 2013

April Showers Blog Hop


It's my day - yay!  Thanks for popping on over to see me as usual I had plenty of ideas of what to use for this blog but in the end settled on two.  Firstly this one:


I guess it needs an explanation eh?  Well when I think of April I always think of April Fools day.  Years ago in the late 70's early 80's there used to be a programme on BBC1 called That's Life - and one Sunday evening they did a documentary about a dog driving a car - it was quite a long documentary and quite interesting showing, I think, an Old English Sheepdog driving along in a car all by itself - of course this was an April Fool with an apt title of Lirpa Loof (which is April Fool spelt backwards).  It's funny what you remember isn't it because I would have only been at about 10 years old but I always think of this on 1st April so I have done a mug rug to celebrate the fact!

I found the picture of the dog and car on the internet and reverse drew it onto some Heat N Bond which I then ironed onto my fabrics and then cut them out to place them on the rug.  The letters are from a sizzix die and are applied the same way.  I machine appliqued around the all edges - I am still only just starting out with machine applique and am still not sure whether I like the stitch my Bernina gives or not!

My next one I have actually made two of:


Again I used a sizzix die for the flowers and appliqued them in the same way - I finished off with buttons and have only just realised how creased it is after looking at this photograph! oh well.

Here is a closeup of my machine stitching:


What do you think? It's not quite as neat as hand blanket stitch but it's ok isn't it - think I will keep practising with it for a while.

Hope you have enjoyed your visit here - if it's your first I hope it won't be your last and if you are one of my regular followers thanks for popping over.  Sorry I was late visiting all of the posts last week but I was on holiday in a hotel and the Wi-Fi wasn't working - have caught up now though and love all of the inspiring mug rugs I have seen so far!

Here is todays schedule for the hop:

MONDAY, APRIL 15th
 
I would also just like to say a big thank you to Erin and Mdm Samm for organising this wonderful hop - I really have enjoyed putting my mug rugs together.
 
Thanks for looking - Dancing in the Rain from Solihull

Tuesday, 2 April 2013

Exciting news

I was walking through the Mailbox in Birmingham a couple of weeks ago (it's where the Fat Face Birmingham shop is based and their sale was on....) when I saw two shops called Birmingham Made Me selling local artists artwork.  So a quick chat and a showcase of my blog via my phone was enough for me to get the go ahead to produce some artwork to be sold in the shop.

Today I took in some pictures and cards and they have all been accepted!  Whoo hoo, it's not just the privilege of knowing that my handmade items are being sold alongside the likes of Harvey Nichols, Bang and Olufsum and the fabulous paintings in Castle Galleries but there is also a Tardis upstairs so I am secretly hoping that there will be a visit from the Doctor himself who may pop in and buy one of my items (well you never know and a girl can dream!).

If you want more information about the Mailbox details are here.

Thanks for looking - a local artist from Solihull

Saturday, 30 March 2013

Tims March Tag

Running a bit late with this one.....


I don't have the Easter Bunny die so I thought I would go with an egg which then turned into Humpty Dumpty following my nursery rhyme theme!  See how cute he looks sitting on T!ms wall - here is a quick tutorial on how to get the tag made:

Firstly draw a feint pencil line about half way down the tag and ink the top half with Stormy Sky and the bottom half with Tea Dye:

 
Then cut out the brick wall and ink with Scattered Straw:
 
Next make a mask using spare card and the brick wall die and place in position on the tag - hold in place with masking tape:

Remove the first few bricks from the wall and using Vintage Photo lightly ink on the right hand side of the exposed bricks (only the right hand side as you still want the majority of the bricks to be Tea Dye):
 
It will look like this:
 
Replace the first three bricks and remove the next line of bricks and ink in the same way:
 
Continue to do this across the width of the tag:
 
When you remove the mask you will have this effect:
I know its more time consuming but it makes such a difference to the finished tag that it is worth it!
 
Remove the bricks from the scattered straw die cut and place in position - see how more realistic the bricks looks with the extra shadows?
 
Stamp a few birdies
 
Make Humpty - I didn't have a big enough egg shape but I cut out a small easter sizzix egg and then drew a larger version of it and hand cut him out.  I finished him using some of the remaining bricks from the wall - I quite like these as the bobbly bits make them look a bit like elbows and knees!
I drew a face on him so I knew where to position the finished pieces and then covered him with crackle glaze and left him to dry overnight.
 
I added grass to the bottom of the tag - here I handcut out a strip from green card as I don't have the T!m grass die yet (so need it though as I seem to be using a lot of grass strips on projects at the moment!):
 
I finished Humpty off with Santa's boots and hat (I figured Santa wouldn't be using them this time of year!), and positioned him on top of the wall:
 
I added some flowers from the Tattered Flower Garland die which I inked up with various spring colours (I do have some metal flowers but not many spring coloured alcohol inks so I preferred to use these to make the tag nice and bright):
 
and voila - finished tag with Humpty's happy face completed - for this I just handdrew eyes, nose (very fiddly to cut out!) and a mouth onto white cardstock with a Black sharpie pen and cut out the individual pieces and glued them in place.
 
I finished the tag by inking around the edges with Vintage Photo and then doubled up some tissue tape, crumpled it and used it as a ribbon.
 
Thanks for looking - Feeling springy from Solihull

Friday, 8 March 2013

Tattered Flower challenge

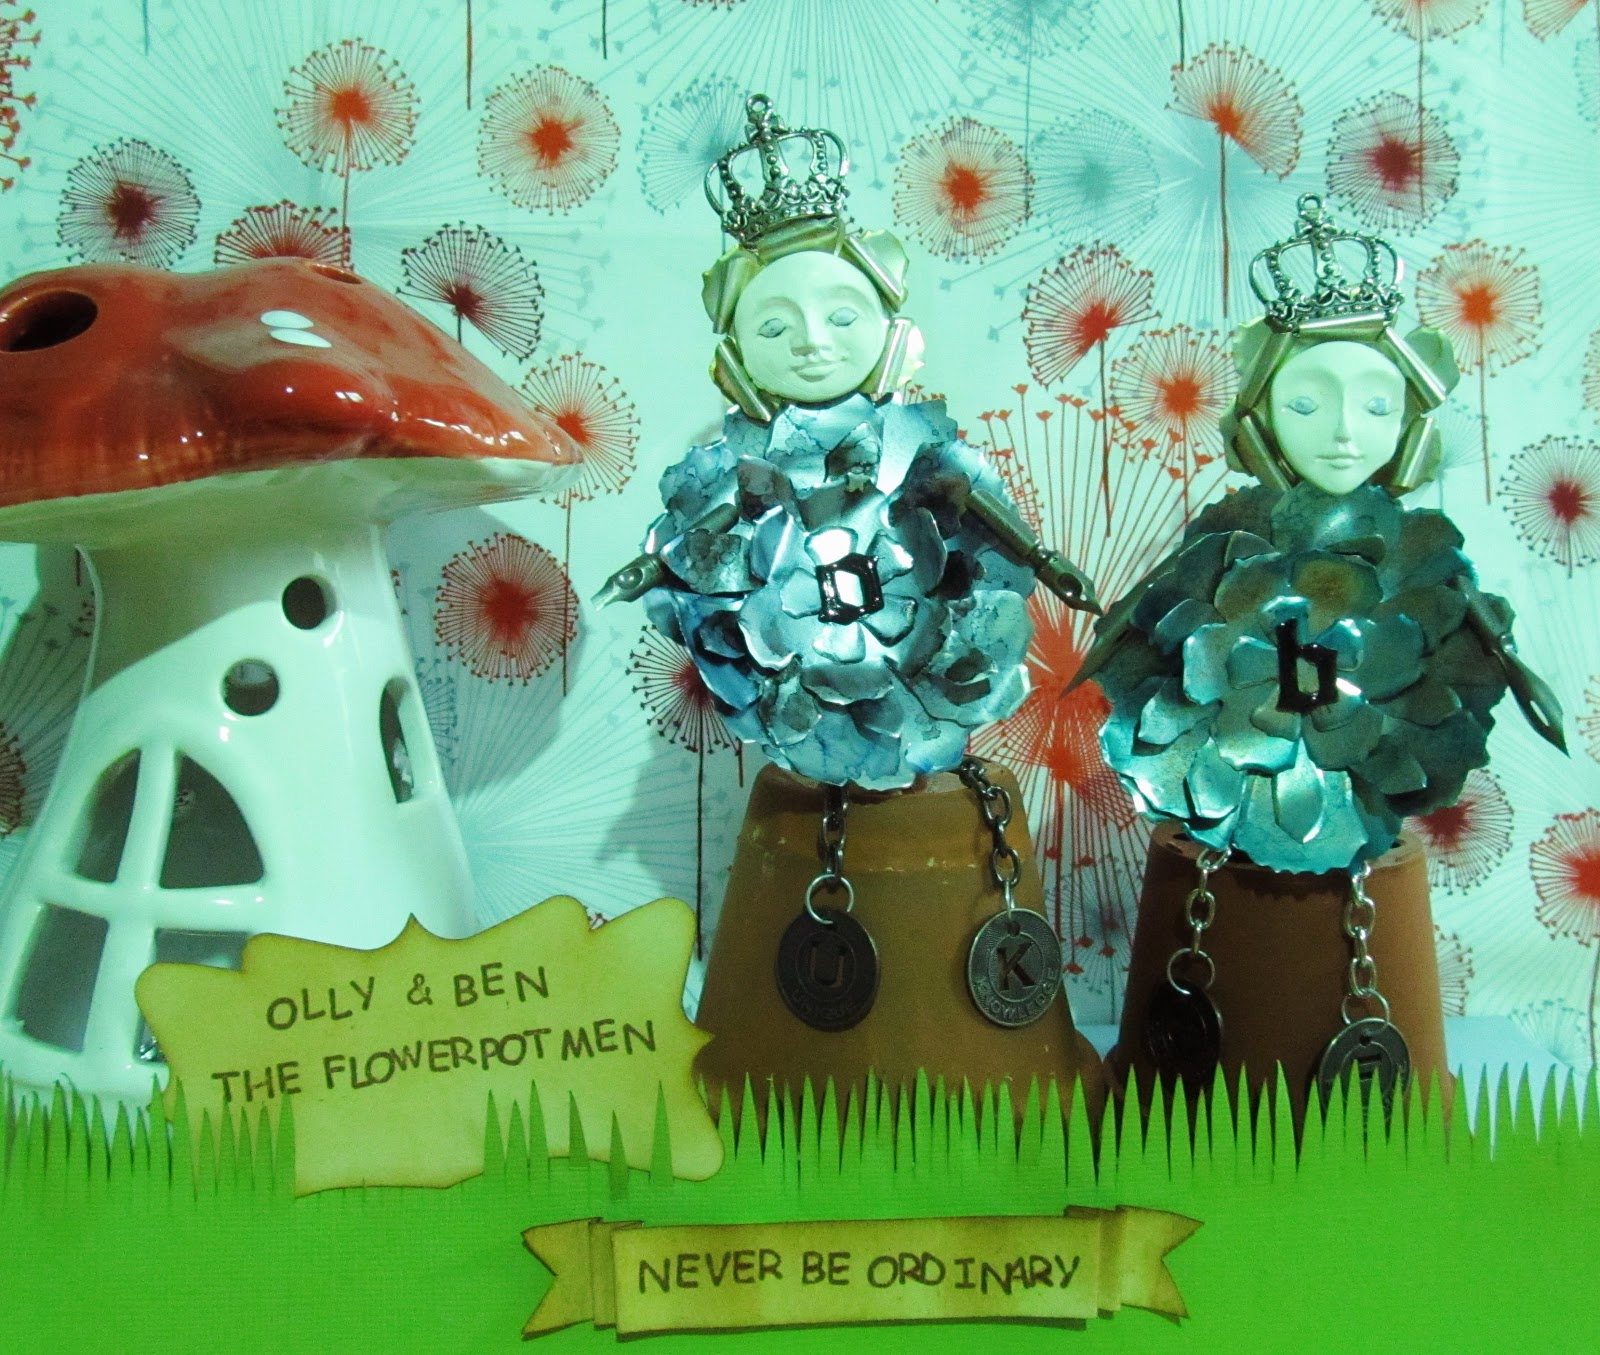
Tim has a challenge on his blog to win $100 worth of stuff! all you have to do is use the tattered flowers (from the sizzix die) on your project.  So I had a little ponder for a few days and then I spotted some pompom people and from there I decided I was going to make people with my flowers.  Then, with the idea in my head of somehow creating flower people and being a child that grew up in the 1970s when I used to watch Bill and Ben the Flowerpot Men, I got the inspiration to make my own Flowerpot Men.

I sent OH out to buy some tins of beers which we had to drink one night (all in the name of art of course!) so that I could cut out some metal flowers, these were then inked with alcohol inks.  In the meantime I made up some faces using a mould and fimo which were left overnight to dry and then yesterday I got a chance to finally play and put them all together.  I based their names on my two children Oliver and Benjamin and here they are:


I apologise about the poor picture quality - after a few lovely days of sunshine the rain has suddenly reappeared in England and looks to be staying for a while so this is the best my daylight bulbs and photoshop skills can manage!

The flowers are cut from the aforementioned tin cans and coloured using stream, stonewashed, copper, pitch black and peach bellini alcohol inks.  I finished off the men with pen nibs for arms, T!ms muse tokens hanging from chains for legs, an 'O' and a 'B' cut from the Once Upon a Time die with black card covered in glossy accents for a nice shine and two crowns.  The faces I finished by lightly inking them with Spun Sugar and then drawing on eyes with Stormy Sky and Black Soot distress markers.

I handcut the grass out of bazzill cardstock (took ages - so need that new T!m grass die now!), the sign is from T!ms Signpost die and the banner is handcut - both titles are stamped using an old Inspirations alphabet set in coffee archival ink and then inked with Vintage Photo distress ink.


Here is a closeup of Olly:


Both are sat on some old flowerpots that I found in the cupboard (who knew we had those!) - they are nothing like the original Flowerpot Men as they were made out of flower pots hence the title Never Be Ordinary!

Hope you like them! they are a big hit in our house and have pride of place on top of the bookcase in the lounge!

Thanks for looking - A Blossoming Artist from Solihull

Wednesday, 6 March 2013

A Fun Day

Have had a fabulous day today doing a demonstration at my local Hobbycraft of T!m and Ranger products.  I did a free make and take of this tag:


and here I am demonstrating to two new crafters:


also known as Mom and Dad! they both came along to support me and were my amongst my first few students!  I made lots of lovely new friends though so a big thank you to all my new students and all my friends and family who came along to support me too (and had a lovely play in the meantime too!).

My next class will be at Hobbycraft on Wednesday 20th March at 11.00am - 1.00pm, which will be this card:


Cost will be £10 - booking is essential and can be done by emailing me at sunshinegirl_hillfield@hotmail.com.  I look forward to seeing some of you there!

Thanks for looking - Covered In Ink from Solihull